Ask the Panel

11 Mar

I love panel quilts. They allow you to get on with quilting without having actually to make a complicated quilt and they give you scope for experimentation without worrying about messing up a quilt that took hours to piece or wasting time on a bit of calico that you don’t know what to do with when it is finished.

I also once went on a thread painting course that was a bit of a waste of time but when I started to use a longarm I realised that panel quilts were the ideal material to practise on.

On this one from SusiBee I did mostly echoing and swirls because it was one of the earlier ones I did. A few wiggly lines for the water and Bob’s your Uncle.

This one allowed a bit more definition with a bit of thread painting on the icebergs and mountains. It is not dense but it is the same technique.

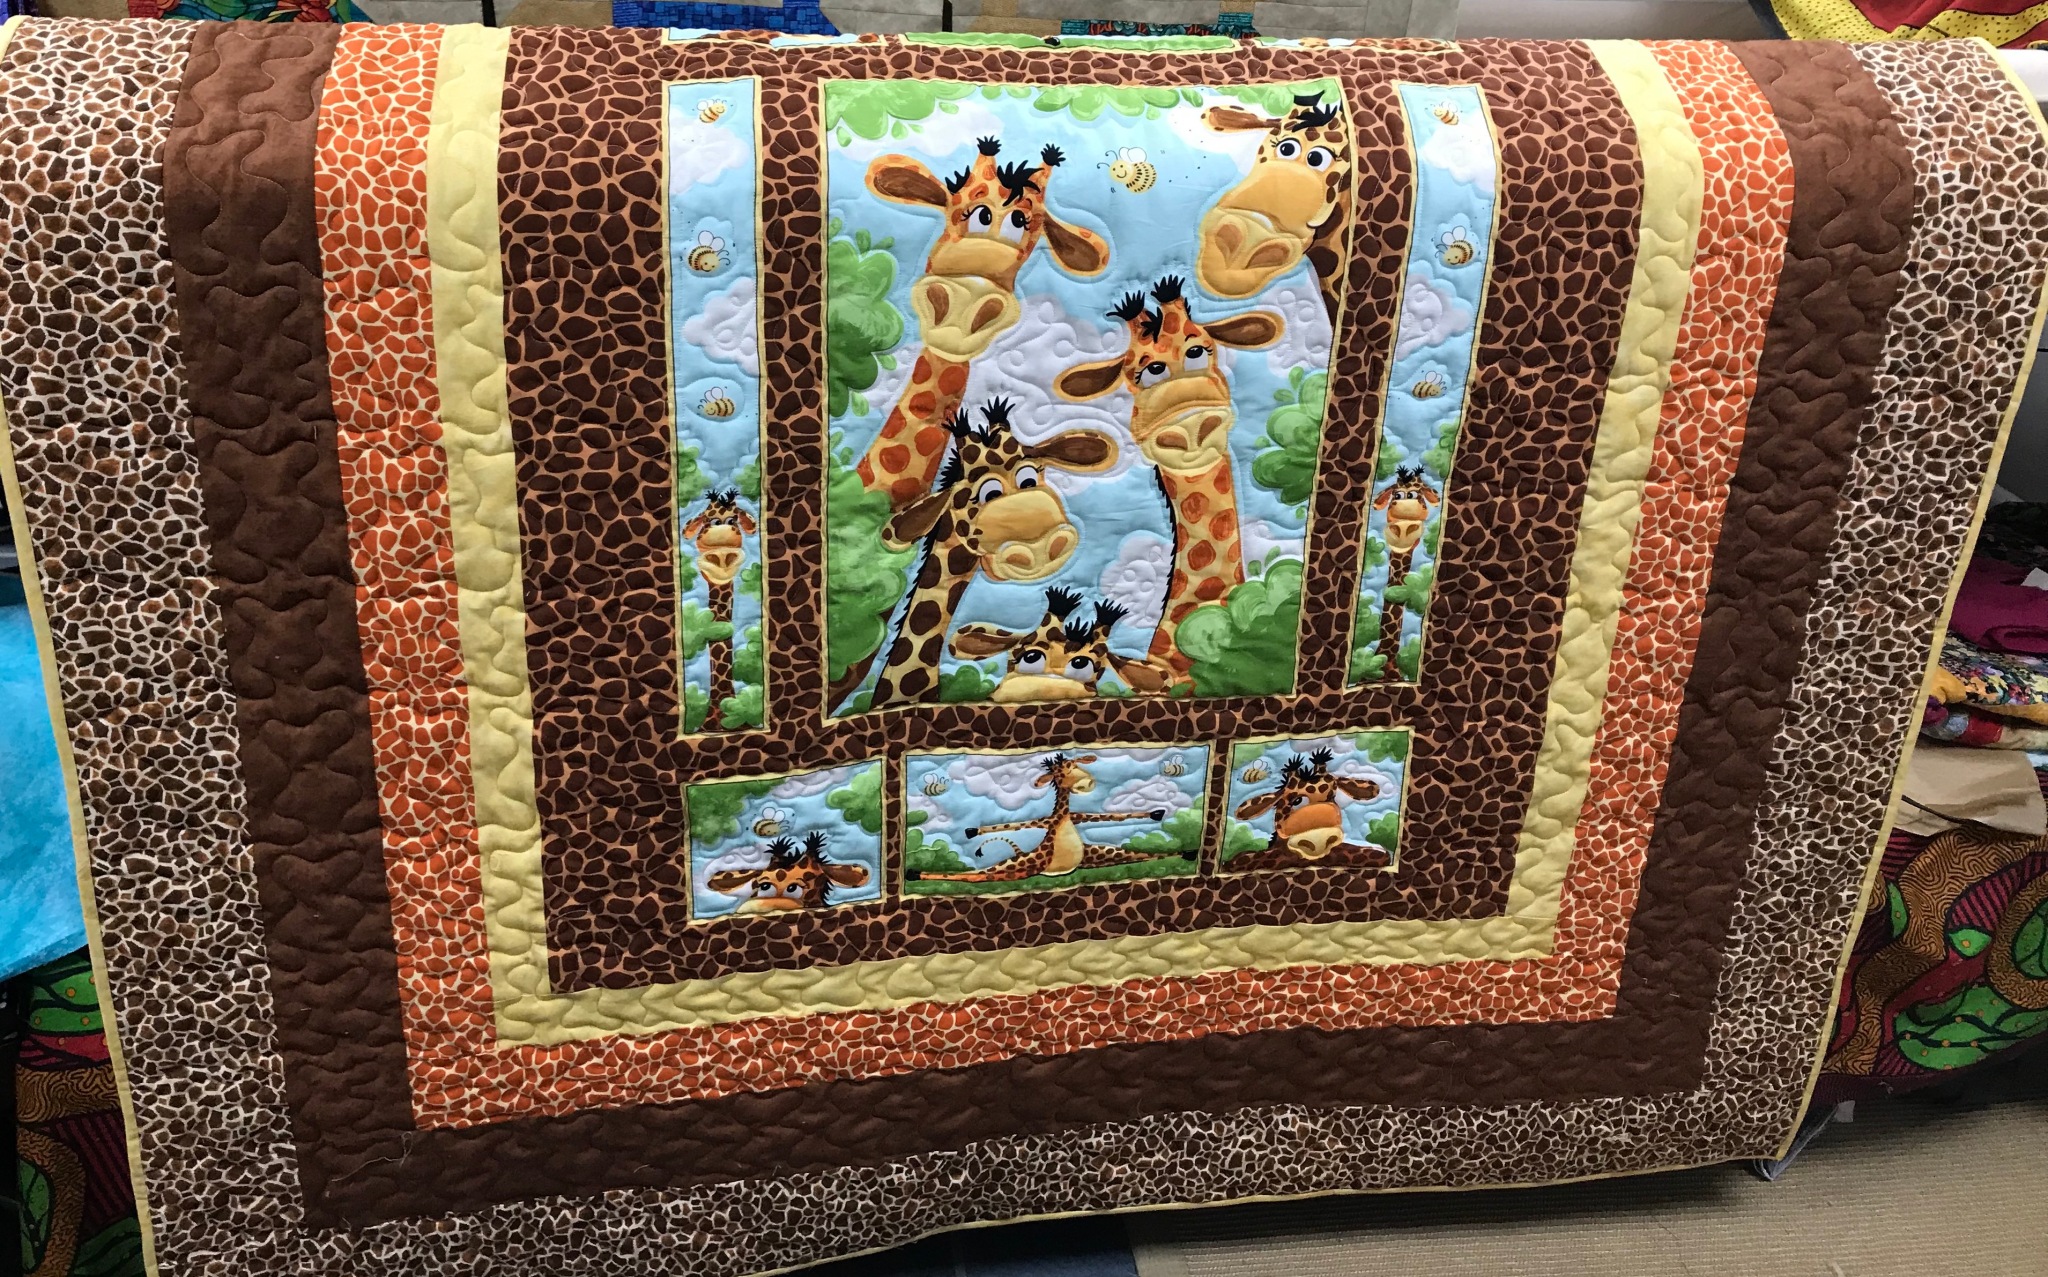
This one gave a lot of scope for echoing and a touch of thread painting but the next one takes it to the next level. The giraffe is my favourite.

Once you get the hang of the panel the next stage is to make a panel into a quilt with some simple borders in matching fabrics..The same criteria apply in that you don’t waste hours of piecing if it all goes pear shaped but so far it hasn’t. You get a full sized quilt made quickly and very difficult to get wrong. There are no points on these, no misshapen blocks and no running out of fabric on the last block. A word to the wise – always measure the pieces, never just add a strip and cut to size afterwards. You will get wavy borders and they are a real pain to quilt.

Panels help to learn techniques and also allow you to get control of the machine instead of it controlling you which is the way it appears when it is brand new. Try it. It’s much more fun than calico and a lot less nerve-racking than a pieced quilt when you are practising.

Bear Facts and Multiplications

16 Jan

It seems a long time since I last posted. In fact it is quite a long time. Tempus Fugit when you are enjoying yourself. Also I have been running a bricks and mortar shop which took up most of my time. Last time I published I think I had completed the Elizabeth Hartman Bjorn the Bear Quilt. The latter was made from leftovers from the Fancy Forest Quilt I made earlier. I don’t know if that qualifies as upcycling but whatever it is it’s an extra quilt top for no extra outlay and that can’t be bad.

After I made the first Bjorn quilt I watched a video of Angela Walters quilting a quilt by Tula Pink. She had taken the Bjorn the Bear pattern and used her own fabrics to add her stamp and I thought it was really attractive. It was not anything I would have thought of doing myself but there it was. Also, in my stash was a bundle of Free Spirit Fat Quarters I had no idea what I was going to do with. A Match made in Heaven. What do you think?

Compare the one on my 3rd December 2018 post. Two totally different quilts with the same basic pattern. I intend to do this again when I find a likely candidate. I love it.

The original for comparison.

I didn’t do the quilting the same way that she did. She did a lot of clever feathers and I think I must be the only person in the Quilting World that does not really like them. Or maybe I am just a scaredy Cat. I really must try and conquer them. Who knows they may even become my favourite pattern. Whatever else it is all good quilting practice and you can’t have too much of that.

There is a reason for my return. My steam driven website is now no more. I have a new site with a new look and hopefully I can keep up with the blogs as I explore more quilts in the future.

http://www.nsaaquilting.co.uk is the address. Hope to see you there.


If You Go Down In The Woods Today

3 Dec

So I made the Elizabeth Hartman Fancy Forest featured in my last post. Afterwards I had a lot of the coloured fabrics left and had wanted to do her Bjorn the Bear pattern for a long time. I decided that this was the time so using the offcuts I did just that.

I am not too sure about the background colour but I guess it will grow on me. Not unhappy with the quilting which is a plus.

IMG_0450

I made each stage of each head at the same time so at the end it all came together in one hit. Easy because they were all the same.

The question is which one do I do next? There are so many.

I think I might use a different fabric this time though. There is such a thing as too much of a good thing.


The Clearing at the end of the Fancy Forest.

14 Nov

I finally completed Elizabeth Hartman’s Fancy Forest. It was a bit of a marathon but if I am honest I enjoyed every bit of it.

I have never liked piecing, probably because I was never inspired by the resulting blocks that were mainly traditional in style. I make a lot of quilts but they need to interest me. I like appliqué because it paints pictures with fabric. Elizabeth Hartman patterns allow me to do that whilst at the same time nailing the art of piecing.

I used Boundless botanicals from Craftsy for the animals and I think the bright, clear, varied colours add to the design. I liked the colours on the original but I love mine.

IMG_0430

Most people seem to do an overall pattern for the quilting but I decided I wanted to give it more of a custom look so I quilted leaves on the background and then went back and worked on each colour on each animal. Once I had decided what I was going to do I enjoyed it immensely.

A couple of owls.

IMG_0435

IMG_0434

Swirly Bunnies

IMG_0436

Fireflies (or butterflies)

IMG_0437

I thought with all those seams and all that to-ing and fro-ing I might have a problem with squaring up the finished quilt. I was wrong. It was perfect. Just straightened the edges and bound it.

It wouldn’t win any competitions but as I wouldn’t dream of entering one ever that is academic.

So if you were considering this pattern but are a bit frightened of it, don’t be. Organisation is the key- not forgetting an accurate quarter inch seam of course, but that applies to most piecing.

Which one shall I do next?

Happy Stitching.


Confessions of an Elizabeth Hartman Addict

28 Oct

I used to be addicted to appliqué. I didn’t enjoy piecing. I couldn’t understand why I would want to construct a traditional pieced quilt. It just wasn’t me.

Then I found Elizabeth Hartman. I first saw her Fancy Forest quilt online and kept coming back to it, thinking it wasn’t really something I could do. Than I discovered it wasn’t paper piecing as I had first thought and decided to give it a try.

Just in case I didn’t enjoy doing it I searched my stash for suitable fat quarters with which to try it out. Bearing in mind the quilt , even the small one calls for two groups of five different shades of the same colourway that was not an easy thing to find. In fact I had the choice of one range of fabric and this is what I produced. Very Harry Potter I think.

IMG_0609

I also practised some ruler work on it which didn’t improve it much but I had proved I could be accurate enough to tackle Elizabeth Hartman. That was only the beginning.

I then went on to do the flamingos and to paraphrase the song, it was so nice I did it twice.

IMG_0084


IMG_0422

Then came the dachshunds. I put this one in the window of the shop and you would not believe how many people wanted to buy it. Admittedly they are quite cleverly designed.

IMG_0177I had a few quilt kits that had not sold and they involved a lot of 2.5″ strips so the next one was a no-brainer. I give you unicorns.

IMG_0419


Finally I sent for a big box of fat quarters and made a Fancy Forest more after the Elizabeth Hartman style. It is about to go on the frame for quilting. I might need to look at it a while before I decide how to quilt it. An allover would be easiest but I am not sure how that could be achieved without losing the integrity of the animals. Thinking cap time I think.

IMG_0343

My advice, if you have been contemplating any of her patterns is to go for it. You need to be organised and have lots of plastic bags to put each animal into and you need an accurate quarter inch seam then it’s a doddle – doddles being relative of course. If you are the type who wants to make a quilt in an afternoon stick to panels. It takes time but is strangely therapeutic and think of the sense of achievement when it’s finished. I will post a picture if finishing happens in the near future. I think it could take some time.


Giraffes and More Giraffes

23 Oct

I disappeared for a while but I’m back now, for the time being anyway.

I opened a shop which takes up most of my time but I thought some of you might like to see what I have been doing in the interim.

I bought a longarm quilting setup and for someone who was used to the limitations of a Grace Frame and Janome 1600P it is a revelation. Instead of making do with overall meanders as the easiest way to overcome the lack of space at the end of the quilt I can now do anything I want. Instead of putting up with flimsy rails bending and distorting the quilt I can now produce quilts that are square in all directions.

The best way I found to practise, because practice is what it is all about, was to use panels. That way I hadn’t spent a long time making a quilt only to be disappointed in the result when quilted. I have also done a lot of quilting for Project Linus although that in itself, whilst good practice was at times depressing.I will explain later.

This is me practising pebbles. Not too shabby.

IMG_0212


IMG_0211

Then there is the matching quilt. More pebbles. Should be good at them by now.

I also did a version of that one with borders and with a denser, polyester wadding.


IMG_0160No pebbles but lots of meandering. I wanted something cosier for a baby with this one.

If you just like the giraffes but bigger how about this one.

IMG_0210That made a very useful playmat. Nobody’s floor is really clean after all and babies chew everything.

These panels gave lots of scope for bringing out the characters of the animals and pebbles, don’t forget the pebbles.

Luckily giraffes are in this year but people do tend to want to buy the finished article when I want to sell the panels. Unfortunately they are not for sale. I like them too much and have invested too much time in them for which no-one would want to pay.

I was going to comment on the quilts I have been finishing for Project Linus but experience tells me I will upset someone because they will not actually read what I write. So all I will say is that if you are thinking of making a quilt, whatever the charity, make it as if you were going to give it to a member of your family. I personally will not be finishing any more. I will make them from scratch. If I am going to spend hundreds of pounds of my own money I want the result to be acceptable. I will use good fabric, make sure no selvedges are showing and that I have finished all the seams properly. More emphasis on quality and less on quantity. Enough said.

Sea Glass of a Different Hue.

15 Dec

Having mentioned my glass fusing adventures in my last blog I thought I would keep you up to date on how we are progressing.

I am still surprised at the popularity of the glass jewellery I sell through my shop. I started selling it as an extra for non quilters visiting the shop in the school holiday season. Ironically, during the season seems to be the time they do not sell as well. Off season they go like hot cakes. The main problem I have is that I have to spend my only day off making more. Still there are worse ways to spend a day.

For a few blissful weeks I even had someone to clean the house as I obviously don’t have much free time. Unfortunately the karma ran out and I was let down not once but twice so I am back to doing my favourite job of cleaning as well as the ironing, working 6 days a week and making glass. Still it hasn’t killed me yet and who needs a spotless house and beautifully ironed clothes anyway. (It’s a sad fact that actually I do.)

Back to the glass.

I use mainly dichroic glass which is a glass with a metallic finish. It can either be left as it is and fused or fused with a clear cap. Each gives a different effect.IMG_0243Without

IMG_0244With

IMG_0190 (1)A mix of coloured and clear dichroics.

Then we have the ones with a leather cord, mainly because the design does not really allow room for a bail.

IMG_0181

IMG_0182At the beginning I had favourites that I would put in the window. I have now learned that everyone seems to like a different type so anything goes. The secret is to put them in the sun in the window. They shine beautifully and sell themselves.

Dichroic is an interesting material. It changes colour as the wearer moves  which means that it looks different from different angles and pretty from all. Putting a clear cover on it gives more depth to the piece whereas without it makes a definite statement. Dichroic glass is pure ‘look at me’ however it is used.

Even if I wanted to duplicate a piece, and I don’t, it would be difficult. There is really no telling how a piece will turn out. That is the beauty and the mystery of glass. You can plan and design but once it goes into the kiln it can do whatever it likes. With the capped glass bubbles are the thing. Sometimes it is a problem but often it adds to the design.

IMG_0266

I look at them as little magnifying glasses. The appeal of these pieces is that they are organic. They are not mass produced and so they are all different. As such you will never see someone else wearing the same pendant.

I would suggest anyone interested go on a course but unless you are prepared to make a financial commitment don’t tempt yourself. There are microwave kilns available so that you don’t have to buy a kiln but I am a bit of an addict when it comes to these things and the idea of making one at a time rather than a batch would put me off. There are lots of youtube videos about using the microwave kiln from http://www.glaze.co.nz. These show you how to make particular pieces of jewellery and are easy to follow. In fact there are lots of videos about dichroic jewellery making catering for all tastes.

I have just found this in ‘drafts’ so here goes. I am also going on another course as I want to improve on what I have achieved. Also it is a good excuse for a couple of days away over my birthday week.


Seaside Postcards from McKenna Ryan

14 Apr

One of the perks of a wholesale account with McKenna Ryan is that I also get to make her quilts at an affordable price. Imagine the problems I had resisting the deal on laser cut kits on two of her designs – ‘From the Coast with Love’ and’ Snow Buds’

COAST10-2

snow Buds

It is sort of cheating but I just fancied a bit of applique that I could do in a hurry. I have started on the Coastal one as I thought it would make a good window display, my being by the seaside and such. Added to which, I already bought the pattern on its own and having it made up as an example never hurts to sell a pattern.

I also have two Kukaburra Cottage quilts cut out ready to applique so the next few weeks could be busy on the applique front. I just need the machine to behave now and I will have fun.

I have laid out some of the Coast but I will be doing it with satin stitch rather than the McKenna Ryan method. It is the way I like to work and even wall hangings need a wash occasionally and I would not be happy if they frayed. Having said that I see why she uses her straight stitch method as it means the lines stay clean on what are almost paintings done in fabric.

Here are the first three laid out.

IMG_0243


IMG_0245

IMG_0244

The fabric is interesting. It might be interesting to try it with other fabric too.

I will keep you posted on progress.

Fossil Ferns and Fun in the Sun

19 Mar

Finally everything is sorted – well most things- and my shop is open in Polperro in Cornwall. I am glad to report that despite the fact there is practically nobody about, we are selling steadily. There have been several quilters actually staying in the village and that means they have to resist the shop for at least a week. Thankfully few do.

IMG_0069

The glass jewellery I make  with the occasional input of various members of the family is also going well. The secret seems to be to have things that are different and so not available elsewhere. Alas I was having a ‘day off’ – if you can count making jewellery as a ‘day off’ – and was not the one who made the first of our quilt sales but it is still a lovely feeling that someone now has an heirloom made by yours truly.

I have sorted out the sock monkey kits. They contain everything needed to make a monkey, including the stuffing of course. An added  bonus is that instead of a paper bag or box they are packed into a matching bag with an embroidered sock monkey. In other words when the monkey is finished the bag is usable in its own right. We waste nothing here.

IMG_0236


IMG_0237

Anyway, if you are visiting the West Country call in and see us. I don’t think you will be disappointed. We have Fossil ferns in abundance. We have a great many of the Makower plains. We have Elizabeth’s Studio prints and Laurel Burch collections. We have a wide range of fun and funky fabrics. It is certainly a bright and cheerful place to be.

IMG_0227

If I get lonely I talk to the Dolls (no not really).


Socks and Monkey Business

8 Jan

Meet my friends the sock monkeys. Over Christmas week I moved from hating the blessed things to having great fun making them. I decided that I would like to carry kits for making sock monkeys in my new shop. After all there is many a rainy day on an English seaside holiday and there is nothing like a bit of creative needlework to fill the time. I read all the conventional information on making them and watched the odd youtube and then jumped in. The first one I hated and now I don’t know why. Meet Red.

IMG_0211

He is chilling in front of the computer and later on I caught him swinging from the beams.

IMG_0213

He also managed to teach his little friend Ginger bad habits, transforming him from a perfectly well behaved little chap into a bad mimic.


IMG_0212

IMG_0216

At least he looks scared.

Henry got the hump because he couldn’t join in.

IMG_0214


However when he tried he nearly frightened himself to death.

IMG_0220


In case you hadn’t gathered I was experimenting with different types of eye. I liked the googly eyes best but they don’t work unless you are prepared to make buttonholes through which to insert them. In the end I decided the felt were the simplest and most effective. Red was the first and Henry the last but I actually made a few more before I was satisfied.

Meet the gang.

IMG_0218

I also found that the traditional way of doing some of the stages, particularly the arms was not the best for me so I developed a different approach. Hopefully the kits  will give lots of people hours of fun. First I have to jump a few hoops with Trading Standards and the European Directive on Toy Safety or some such.

Watch this space. I might even share my journey into the fascinating world of the sock monkey and the tips for making life easier.

Watch this space.